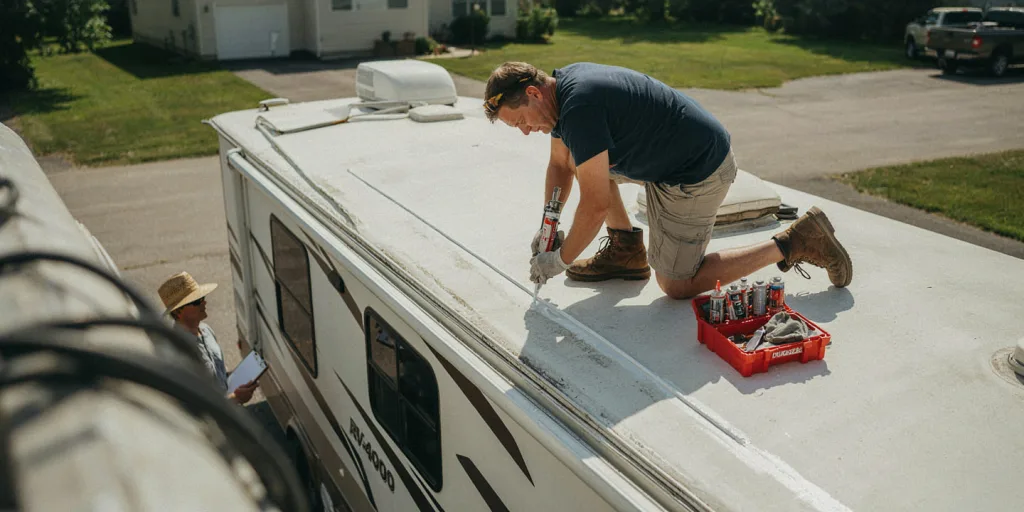
To reseal a camper roof, start by inspecting the roof for cracks, loose sealant, gaps, or damaged areas around vents, skylights, seams, and other openings. Clean the area well and let it dry completely, then carefully remove any loose or peeling sealant. Apply a new RV roof sealant that is made for your camper’s roof material, making sure all cracks and seams are fully covered. Once finished, allow the sealant to cure according to the product instructions before exposing the roof to rain or washing the camper. So now let’s discuss this more.
Here’s how to reseal a camper roof and what to look for while you’re up there.
Your camper roof takes a beating.
Sun, rain, snow, ice, heat, cold, road vibration, and normal movement of the camper can cause the sealant around roof openings to dry out and crack.
Common problem areas include:
Once the sealant starts cracking or pulling away, water can find its way inside.
Minnesota weather can be especially tough on camper roofs. Hot summer days followed by freezing winter temperatures cause roof materials and sealants to expand and contract throughout the year.
For Minnesota campers, spring and fall are good times to do it.
Check the roof again after:
You don’t always need to reseal the entire roof. Often, you simply need to repair the sealant around vents, seams, and other openings.
Before getting started, gather your supplies.
Camper roofs can be made from materials such as EPDM rubber, TPO, fiberglass, or metal. A sealant that works on one roof may not be right for another.
If you aren’t sure what kind of roof you have, check your owner’s manual or ask an RV repair shop before applying anything.
Start by taking a close look at the roof.
Don’t just check the area where you think the leak is coming from. Water can enter in one spot and travel before showing up somewhere else inside the camper.
Look closely around every roof vent, skylight, antenna, air conditioner, and seam.
If the roof feels soft when you walk on it, stop and have it checked. A soft roof can be a sign that water has already damaged the wood underneath.
Also, not every camper roof is designed to be walked on. Check your owner’s manual before climbing onto it.
Sealant sticks best to a clean surface.
Wash the area around the old sealant with a cleaner that is safe for your roof material. Remove dirt, leaves, sap, and other buildup.
Let the area dry completely before applying new sealant.
This step matters. Putting fresh sealant over dirt or moisture can keep it from sticking properly.
You don’t always have to remove every bit of old sealant.
If the old sealant is still firmly attached and in good condition, new compatible sealant can sometimes be applied over it.
However, cracked, loose, peeling, or badly damaged sealant should be removed.
Use a plastic scraper and work slowly.
Avoid digging into the roofing material. Rubber camper roofs can be damaged surprisingly easily.
Once the loose material is removed, clean the area again and let it dry.
Now you’re ready for the new sealant.
Apply a steady bead around the area you’re repairing.
For horizontal areas on the roof, a self-leveling RV lap sealant is commonly used. It spreads slightly as it cures and helps cover seams, screw heads, and roof openings.
For vertical areas, such as the side of a camper, you generally need a non-sag sealant instead.
Make sure the product you use is approved for your roof material.
Cover the entire seam or opening without leaving small gaps where water could get through.
Roof vents get a lot of attention, but don’t forget the edges of the roof.
Check where the roof meets the front, rear, and side walls of the camper.
These areas can develop cracks as the camper moves and flexes on the road.
A small crack may not look serious, but it doesn’t take much space for water to get inside.
Give the sealant enough time to cure before exposing it to rain or washing the camper.
Drying time depends on the product, temperature, and weather.
Read the directions on the sealant you’re using instead of guessing.
If rain is coming soon, it may be better to wait for a dry stretch of weather before starting the repair.
If you’re comfortable working on the roof and the roofing material itself is still in good shape, repairing cracked sealant can be a reasonable DIY job.
But there are times when it’s better to have the roof inspected by a professional.
Get some help if you notice:
At that point, adding more sealant may only cover up a bigger problem.
One mistake we see is layer after layer of sealant piled onto the same area.
More isn’t always better.
If old sealant has failed badly, adding another thick layer on top may not solve the leak. The damaged material may need to be removed so the area underneath can be inspected and repaired correctly.
You also want to make sure you’re sealing the actual source of the leak instead of the place where water happens to appear inside.
The cost depends on what the roof needs.
A few small sealant repairs can be fairly simple. A camper with several leaking seams, damaged roofing material, or water damage underneath can require much more work.
That’s why catching roof problems early makes such a big difference.
Spending a little time inspecting your roof can save you from having to repair ceilings, walls, insulation, cabinets, and flooring later.
Keep these simple habits in mind:
It also helps to take a few pictures of your roof each time you inspect it. You’ll have something to compare later and may notice changes that weren’t obvious before.
A roof leak doesn’t usually get better on its own. Catching it early is the easiest way to protect your camper and avoid a much larger repair later.