
recent post
What’s the difference between an RV and a camper
An RV drives on its own engine. A camper tows...
How to keep RV pipes from freezing while camping
Keep RV pipes from freezing while camping: insulate lines, run...
Are pop up campers worth it?
Are pop up campers worth it? For St. Cloud weekenders...
What Causes RV Delamination?
RV delamination happens when the outside wall of an RV starts pulling away from the layers underneath it. You may first notice a small bubble, ripple, bulge, or wavy spot on the side of your camper.
At first, the damage may seem like it only affects the appearance of the RV. However, delamination can be a sign that water has entered the wall. If it is left alone, the damaged area may spread and lead to rotten wood, mold, soft walls, and more costly repairs.
Understanding what causes RV delamination can help you catch the problem early and protect your camper.
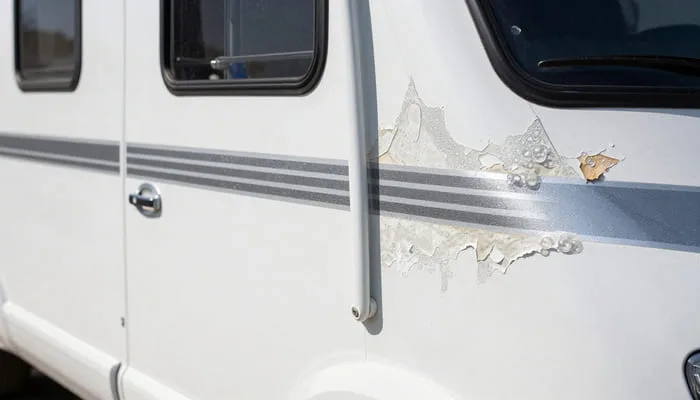
What Is RV Delamination?
Many RV exterior walls are made by pressing several materials together. A typical wall may include:
- An outer fiberglass panel
- Adhesive or bonding material
- Wood or composite backing
- Foam insulation
- An interior wall panelAn interior wall panel
These layers are meant to stay tightly bonded together.
When the adhesive weakens or the materials inside the wall become damaged, the outer fiberglass can begin to separate. This separation is called delamination.
The damaged area may feel soft when pressed, but not always. Some areas may feel firm even though the layers underneath have started coming apart.
Water Leaks Are the Most Common Cause
Water is the main cause of RV delamination.
Even a small leak can allow moisture to enter the wall. Once water gets between the wall layers, it can weaken the adhesive and cause wood materials to swell, soften, or rot.
Water often enters around:
- Windows
- Roof seams
- Slide-outs
- Doors
- Roof vents
- Exterior lights
- Awning mounts
- Storage compartments
- Corner trim
- Ladder mounts
- Plumbing openings
- Air conditioner seals
Leaks are not always easy to see. Water may enter near the roof and travel inside the wall before showing up several feet away.
This means the visible delamination may not be located directly next to the leak.
Old, Cracked, or Missing Sealant
RV sealant does not last forever.
Sunlight, rain, snow, road vibration, and temperature changes can cause it to shrink, crack, or pull away from the surface. A gap that looks very small may still let water into the wall.
Sealant should be checked around windows, doors, roof edges, vents, trim pieces, and other openings.
Do not assume the seal is good just because it looks fine from a distance. Some cracks are only visible when you look closely.
Replacing worn sealant early is usually much easier and less expensive than repairing a delaminated wall later.
Minnesota Freezing and Thawing
Minnesota weather can be hard on campers.
Water may enter a small crack during rain or melting snow. When temperatures drop, that water can freeze and expand. This can make the opening larger and allow even more moisture to enter.
Repeated freezing and thawing can also put stress on old sealant, wall joints, roof seams, and trim.
Campers stored outdoors near St. Cloud should be inspected before winter and again in the spring. Snow and ice buildup can hide damaged seams, so it is important to check the RV once the weather warms up.
Heat and Sun Exposure
Long periods of heat and direct sunlight can weaken the bonding material inside an RV wall.
On a hot summer day, the exterior of a camper can become much hotter than the surrounding air. Over time, this heat may cause the glue between the wall layers to lose strength.
Dark-colored areas may absorb more heat, but any RV can be affected.
Heat-related delamination often develops slowly. You may first notice light waves or bubbles on the side that receives the most sunlight.
Parking the RV in shade or using a covered storage area may help reduce sun and heat damage.
Accident or Impact Damage
A collision, tree branch, hailstone, road debris, or tight campsite can damage an RV wall.
Even a small crack can give water a way into the camper. Damage around trim, windows, corner pieces, and storage doors can be especially easy to miss.
After an accident or storm, check the area carefully for:
- Hairline cracks
- Loose trim
- Broken sealant
- Dents
- Gaps around windows or doors
- Soft wall sections
Small exterior damage should be repaired before water has time to get inside.
Roof and Drainage Problems
Roof damage can lead to wall delamination, even when the side of the RV looks fine.
Water may enter through a roof seam, vent, air conditioner seal, antenna mount, or damaged roof membrane. From there, it can travel down the inside of the wall.
Blocked gutters or poor drainage can also cause water to sit against seams and trim for long periods.
Checking the roof is an important part of diagnosing delamination. Fixing only the side wall may not solve the problem if the leak is coming from above.
Age and Normal Wear
As an RV gets older, the materials inside the walls naturally wear down.
Adhesive can become brittle, wood can weaken, and repeated road vibration can place stress on wall joints. An older camper may also have several layers of past sealant or repairs that make leaks harder to spot.
Age alone does not always cause delamination, but it can make the RV more likely to develop it.
Regular inspections become even more important as the camper gets older.
Signs of RV Delamination
Common signs include:
- Bubbles or raised spots on the fiberglass
- Wavy areas on the side of the RV
- Bulges near windows, doors, or trim
- Soft spots in the wall
- Cracks around windows or exterior fixtures
- Loose wall panels
- Water stains inside the camper
- Peeling wallpaper or wall covering
- A musty or damp smell
- Discolored wood
- Mold or mildew
- Rusty screws near wall openings
- Doors or windows that no longer fit correctly
Delamination may be easier to see when sunlight hits the wall from the side. Stand near the front or rear of the camper and look along the length of the wall. Ripples and bulges often stand out more from this angle.
How to Check Your RV for Delamination
Start with a slow walk around the camper.
Look closely at each side in good daylight. Pay extra attention to areas around windows, doors, roof edges, slide-outs, and storage compartments.
You can gently press suspicious areas with your hand. A soft, loose, or hollow-feeling section may need further inspection. Do not push hard, since damaged fiberglass may crack.
Inside the RV, check cabinets, corners, ceiling edges, windows, and the floor for moisture or staining.
A moisture meter may help locate damp areas, but it should not replace a full inspection. Water can travel through an RV wall in unexpected ways.
Is Every Bubble a Sign of Delamination?
Not always.
Some small waves may be caused by how the wall was built, temperature changes, or slight movement in the materials. Older RVs may also have minor surface unevenness that is not getting worse.
However, a new bubble, growing bulge, soft spot, or area near a leak should be checked.
Taking photos can help you track changes. Photograph the area from the same angle every few weeks. If the spot grows or changes shape, it may be active delamination.
Can RV Delamination Be Repaired?
In many cases, yes.
The repair method depends on the size of the damaged area, the condition of the materials inside the wall, and how long water has been entering the camper.
A smaller area may be repaired by:
- Finding and stopping the leak
- Drying the wall
- Injecting or applying the correct adhesive
- Pressing the layers back together
- Resealing the repaired area
A larger damaged area may require the wall to be opened. Rotten wood, wet insulation, mold, or damaged backing may need to be removed and replaced.
Some repairs require part of the fiberglass exterior to be removed. In severe cases, a full wall panel may need replacement.
The sooner the problem is found, the more repair options may be available.
Why the Leak Must Be Fixed First
Repairing the fiberglass without stopping the leak will not solve the problem.
New adhesive will not hold well if the wall is still wet or damaged. Moisture left inside can continue to cause rot, odors, and mold.
A good delamination repair should answer three questions:
- Where is the water entering?
- How much of the wall is damaged?
- Are the materials inside dry and strong enough to repair?
Skipping any of these steps may lead to the same problem returning.
How Much Does RV Delamination Repair Cost?
The cost depends on the amount of damage and the type of wall construction.
A small repair may only involve resealing an opening and rebonding a limited area. A large repair may require removing windows, trim, fiberglass, insulation, or interior wall panels.
The price may also depend on:
- The location of the damage
- How long the leak has been present
- Whether wood has rotted
- Whether mold is found
- The size of the affected area
- The availability of matching materials
- Whether paint or graphics need repair
An inspection is usually the best way to understand the work involved.
How to Help Prevent RV Delamination
Inspect your RV several times each year. Spring and fall are especially important times to check it in Minnesota.
Look closely at:
- Roof seams
- Window seals
- Door frames
- Exterior lights
- Slide-out seals
- Corner trim
- Storage doors
- Awning brackets
- Vents
- Ladder mounts
- Plumbing openings
Replace cracked, loose, or missing sealant with a product made for the surface and location.
Keep the roof clean so dirt does not hide cracks or damaged seams. Remove heavy snow buildup when it is safe to do so.
After a hailstorm, long road trip, or accidental impact, inspect the camper again.
Indoor or covered storage can also help protect the RV from snow, ice, rain, and direct sunlight.
Read similar posts
How to remove stickers from a camper
Do Not Ignore a Small Delaminated Area
A small bubble may stay the same size for a while, but it may also be the first visible sign of a larger moisture problem.
Water damage often spreads inside the wall before it becomes easy to see from the outside. Waiting may allow more wood, insulation, and wall material to become damaged.
Having the area inspected early can help you understand whether it needs immediate repair or simply needs to be watched.
RV Delamination Repair in St. Cloud, MN
If you notice bubbles, waves, soft spots, water stains, or other signs of wall damage, All Campers can inspect your RV and help find the cause.
We provide RV and camper repair services in St. Cloud, Minnesota. We can check for leaks, look at the damaged area, and explain the repair options based on the condition of your camper.
Catching a leak early may help prevent a small repair from turning into major wall damage.
Contact All Campers in St. Cloud, MN to schedule an RV inspection or ask about delamination repair. Check our RV delamination service
October 19, 2026
No Comments
October 12, 2026
September 28, 2026