
Your RV roof leaks in the spring thaw but not during winter because liquid water cannot move through the roof while everything is frozen solid. In St. Cloud, deep winter keeps temperatures below zero and locks snow and ice in place, so even a cracked seam holds until things warm up. When the spring thaw arrives, snowmelt finds tiny gaps in aged sealant around points like the fridge vent and front cap seam. Those gaps were widened earlier by ice expanding inside them overnight. The reason why does my rv roof leak only in spring is that the damage is done in winter, but the stain only appears once melt water travels.
Most search results show generic roof membrane failures, but local repair experience points to caulk failures at specific winter transition points. A technician finds the real source by reading the stain pattern inside the ceiling, not by staring at the drip. The sections below explain the mechanism, the local failure points, and what you can do before a shop can see you.
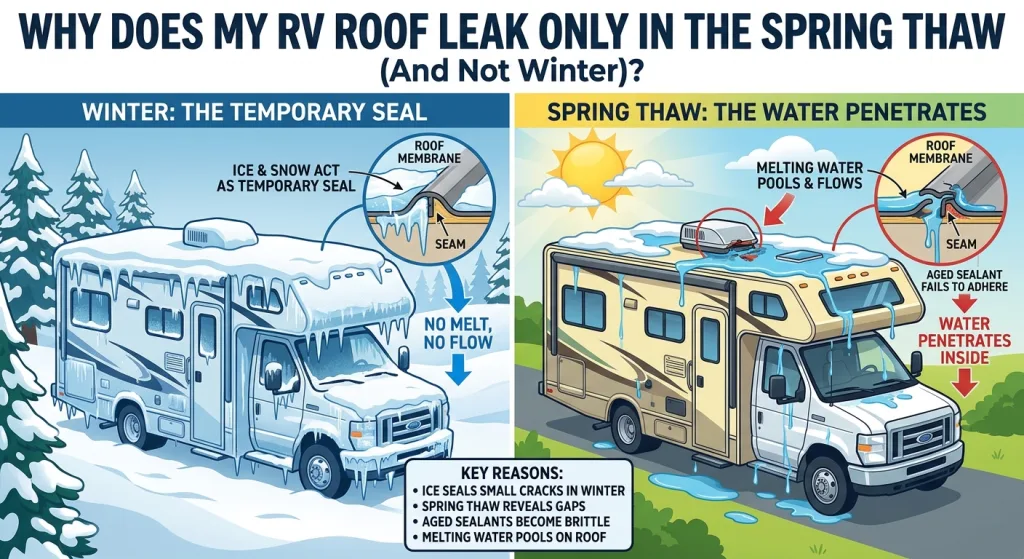
The Freeze-Thaw Mechanism: Why Leaks Appear in Spring
Water remains solid and stationary in deep winter
Deep winter in St. Cloud means temperatures stay well below freezing for long stretches. Snow that lands on the roof becomes part of a solid pack. Liquid water cannot flow through a hairline crack when the crack itself is plugged with ice. The roof may have open seams, but the water inside them is frozen solid. When the season shifts and daytime temps rise above freezing, that ice turns to liquid. The melt water then moves by gravity and capillary action into any opening it touches.
Expansion of micro-cracks overnight
A micro-crack in sealant may be invisible in fall. During a cold night, any moisture inside that crack freezes. Water expands by about nine percent when it becomes ice. That expansion pushes the crack walls apart. Each night of freezing widens the gap a little more. By late winter, a hairline fissure can become a channel wide enough for snowmelt to enter. The process is slow and silent. You will not see it happening because the roof is covered in snow.
Cold embrittlement of aged sealant
Sealants age. After several seasons, the flexible bead on a roof loses its stretch. In St. Cloud sub-zero cold, that aged material becomes rigid like hard plastic. A rigid bead cannot absorb the small movements of the roof as it flexes. Instead of sealing, it cracks. New sealant stays pliable and moves with the roof. Old sealant at the fridge vent or front cap simply snaps under the stress of contraction.
Symptom season concept
Think of winter as the time of injury and spring as the time of diagnosis. The seam fails in January during a cold snap. The roof leaks no water because everything is frozen. In March, the ice dam releases. Water runs into the channel and stains the plywood underneath. The owner sees a drip in April and assumes the roof just failed. The failure predates the symptom by months.
Identifying the Source: St. Cloud’s Common Failure Points
Fridge vent gasket and front cap seam
Two spots cause most local spring leaks. The first is the fridge vent gasket on the roof. This plastic box lets heat escape from the absorption fridge. The seal around its base takes sun, snow, and freeze cycles. The second is the front cap seam where the fiberglass nose meets the aluminum roof. That joint flexes as the coach moves down the highway. In St. Cloud winters, both spots see repeated freeze-thaw and become weak points.
Tell-tale stain pattern
A local tech looks for a stain that starts small and dark at the highest point, then spreads downward in a narrow line. That line points back to the entry. The visible drip on the floor may be feet away from the true hole. If the ceiling shows a triangular wet mark with the point up, water entered above that point. A round stain with no directional trail often means condensation, not a leak. The tech maps these marks before opening anything.
Water travels inside the laminate
RV roofs are built in layers. Water that enters at a seam can run along the underside of the membrane or through insulation. It follows the lowest path, which may slope toward the side wall. By the time it drips, it has moved sideways. The wet spot on the interior panel is rarely directly below the hole. This is why spraying the roof with a hose without tracing stains leads to wrong repairs.
Inspect in late winter
You can climb up with a ladder in late February when snow has melted from those areas. Press the sealant with a finger; if it is hard or cracked, note it. Check the front cap seam for separation. Doing this before the rains lets you catch the gap while it is still dry. That inspection is a do-it-yourself task. Climbing safely is on you; a stable ladder on level ground is required.
Interim Containment: Managing the Leak Before Repair
Shed water with tarp orientation
If water is actively dripping, you need to shed it outside, not just catch it inside. Place a tarp over the roof with the slope directed to the side, not flat. A flat tarp collects water and adds weight. Tie it so the peak runs ridge to eave, letting melt run off. Inside, put a bucket under the drip and check it often. This is a temporary measure, not a fix.
Limits of tape on cold membranes
RV roof tape will not stick to a cold or wet surface. In early spring, the membrane may be at 35 degrees and damp. Tape applied then peels within days. If you must use tape, wait for a dry afternoon above 50 degrees and clean the area. Even then, treat it as a bridge to a real seal, not a season-long solution.
Remove saturated insulation
Waterlogged foam or fiberglass insulation holds moisture against the plywood. That leads to mold and delamination of the roof skin. If you can safely open the interior panel, pull out the wet batting. Let the cavity air dry with a fan. This step does not stop the leak but protects the structure while you wait for a shop appointment.
Dehumidify the interior
Run a small electric dehumidifier inside the camper if you have shore power. Empty it daily. If power is not available, use moisture absorber buckets placed near the wet area. Open vents on dry days to exchange air. Keeping the interior dry slows damage until the roof is sealed.
Intermittent Triggers: Why It Leaks Sometimes and Not Others
Wind-driven rain direction
A pinhole at the front cap may stay dry in calm melt. When a spring storm hits from the northwest, wind drives rain sideways into that seam. The leak appears only then. You may think the roof is fine because it did not drip last week. The direction of weather matters.
RV leveling and pooling
If you park the RV nose-down, melt water collects at the front seam. That pool finds its way through a weak bead. Park it level or nose-up, and the water sheds to the sides. The same roof can leak at one campsite and stay dry at another based on how the coach sits.
Vent fan suction
A roof vent fan creates negative pressure. If the fan runs while a seam is wet, it can suck water into the interior through a pinhole. Turn off fans when the roof is known to be compromised and rain is falling.
Reproduce conditions to verify fix
After a repair, test it. Run the sprinkler from the windward side. Park level and then nose-down. Run the fan on low. If no water appears over a full day, the fix holds. A shop should do this before declaring victory.
Seasonal Maintenance Cadence
Late fall and early spring schedule
Check the roof in late October before the hard freeze. Note any bead that looks tired. Then verify in early April after the snow leaves. That two-step cadence catches the freeze damage before it becomes a leak.
Why spring-only repairs fail
If you wait until April to seal, the winter cracks already happened. The melt will find them. Sealing in spring stops future leaks but not the one already underway. Fall prep prevents the widening.
Membrane versus bead lifespan
A rubber membrane may last 15 years. The sealant beads at vents and seams last 2 to 5 years. Treating the whole roof as one lifespan leads to neglect of the beads. Watch the beads, not just the field.
St. Cloud pre-winter checklist
- Inspect fridge vent gasket.
- Check front cap seam for separation.
- Clear leaves from roof edges to avoid ice dams.
- Seal any crack wider than a hair.
- Verify ladder mounts and antenna bases. Do this in late fall when it is dry and above 40 degrees.
Spring-Specific Repair Pitfalls
Sealant temperature rating
Self-leveling sealant needs warmth to flow and cure. In early March, St. Cloud mornings are 30 degrees. If you caulk then, it stays gummy or cracks. Read the label; many require 40°F and rising. Wait for a warm day or use a cold-rated product.
Wrong caulk types
A DIY tub of silicone from the hardware store does not move with an RV roof. When the coach travels or temps fall, that rigid bead splits. Automotive seam filler is the same. Use only RV-rated flexible sealant made for roofs.
Sealing over damp wood
If you trowel sealant over a damp seam, you lock water inside. The wood underneath rots while the surface looks fixed. Clear snow and dry the area first. If you cannot get it dry, delay the repair.
Wait or use proper materials
Plan roof work for a dry afternoon above 50 degrees. If a trip is forced sooner, use a tape made for cold application as a stopgap, then redo it properly later. Do not pretend a cold slap fix is permanent.
A St. Cloud repair shop such as All Campers can handle resealing and any water damage repair once the weather allows proper materials to cure.
FAQ
Why does my RV roof leak only in the spring?
It leaks in spring because ice in the seams melts and finds gaps that widened all winter. Deep winter keeps water frozen, so no drip shows. The thaw releases the stored water into cracks at the fridge vent or front cap seam.
Why does my roof leak sometimes and not others?
Wind direction, how the RV is parked, and whether the vent fan runs all change leak behavior. A seam may stay dry in calm weather but leak in a northwest storm or when the coach is nose-down.
How to keep a camper roof from leaking?
Inspect sealant in late fall and early spring. Reseal any cracked bead with RV-rated flexible sealant above its temperature rating. Keep the front cap seam and fridge vent gasket watched closely in St. Cloud’s freeze cycles.
Are RV roof leaks covered by insurance?
A leak from old cracked sealant is usually denied as neglect. Sudden damage from hail or a fallen limb may be covered. Photos and maintenance logs decide the outcome.
How often should you reseal the roof on an RV?
Sealant beads need attention every 2 to 5 years, not the 15-year membrane. A late-fall check and early-spring verify is the cadence that catches freeze damage before it leaks.
Check the fridge vent and front cap seam on your RV this weekend if the snow has cleared from those spots. If you find hard, cracked sealant, plan a warm-day repair before the next rain.